Table of Contents
Skype is a popular video conferencing and communication software developed by Microsoft that enables users to host and join virtual calls, meetings, and online collaboration sessions. Whether you’re managing multiple devices in an organization or setting up a few personal machines, installing or uninstalling Skype silently and automatically on Windows computers can significantly save time and effort, particularly for IT administrators. This guide provides detailed methods to silently install or uninstall Skype, ensuring the process is streamlined and automated without requiring user interaction.
| 1 | 2 |
|---|---|
| Software Name | Skype |
| Architecture | 64-bit |
| Software Version | 8.138.0.203 |
| Download (.exe) | Skype-8.138.0.203.exe |
| Silent Installation | "Skype-8.138.0.203.exe" /VERYSILENT /NORESTART /DL=1 |
| Silent Uninstallation |
What is Silent Installation?
Silent installation refers to installing software without showing any prompts, dialogs, or requiring user interaction. This is particularly useful for IT administrators, automated scripts, or bulk deployments. It brings a host of benefits that streamline software deployment. Here’s a concise look at why silent installation is advantageous:
- Time and effort savings: Automate the installation process, eliminating manual intervention and saving valuable time and effort.
- User-friendly experience: Minimize interruptions and prompts, providing a seamless installation process for users, and enhancing productivity.
- Customization and control: Tailor the installation to your organization’s needs by specifying parameters such as location, language, and components.
- Scalability and efficiency: Easily deploy software on a large scale, saving time and ensuring a streamlined installation process.
Download link for the Skype installer
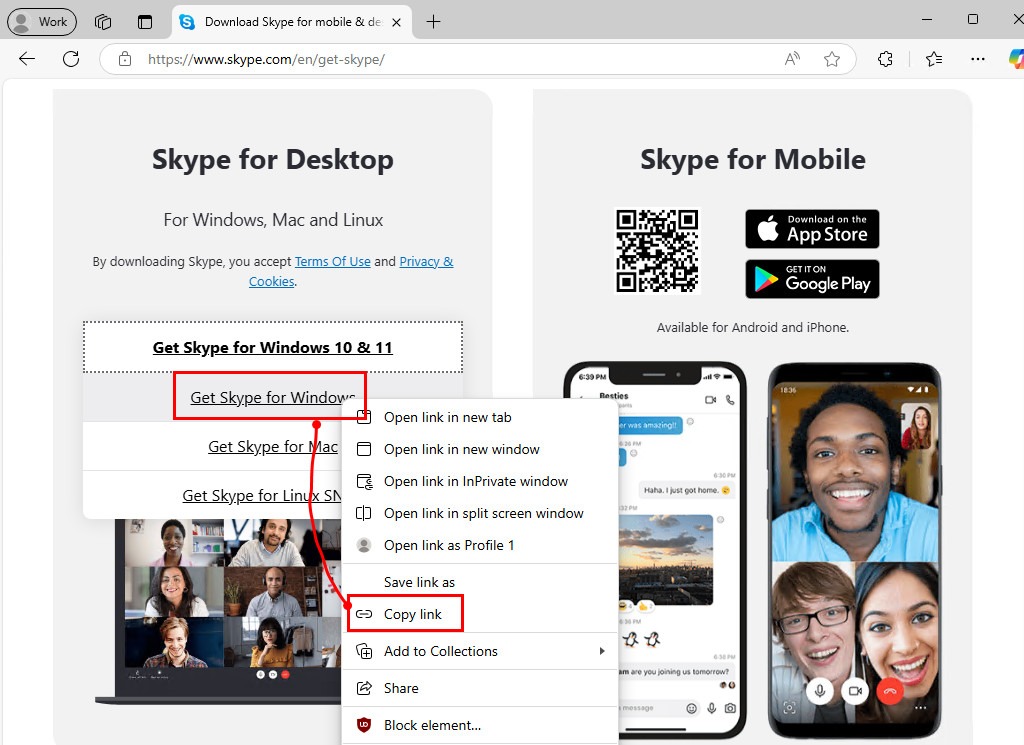
1. The first step is to obtain the direct download link for the Skype installer, which is available as an .exe file, from the link provided below:
Official download link: https://go.skype.com/windows.desktop.download
2. Right-click on the download link → and select Copy link. Take note of this link, as we will use it in automation scripts in the upcoming sections.
Below is the direct download link of the latest version of the Skype at the time of writing this blog post.
https://download.skype.com/s4l/production/win/Skype-8.138.0.203.exeFind the download link using Windows Package Manager (winget)
Alternatively, you can use the Windows Package Manager to download the installer. The Windows Package Manager is a comprehensive package management solution pre-installed on Windows 11 and newer versions of Windows 10. To download the installer for the Intune deployment. Let’s open PowerShell (Terminal) or CMD as administrator then run the following command:
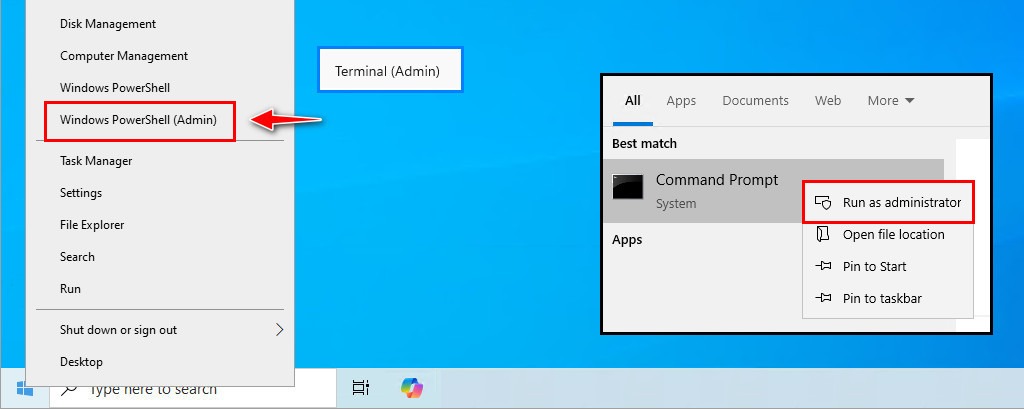
1. To obtain the direct link of Skype, first, right-click on the Windows Start icon, then select Terminal (PowerShell) (Admin) or search for Command Prompt (CMD) and run as administrator.
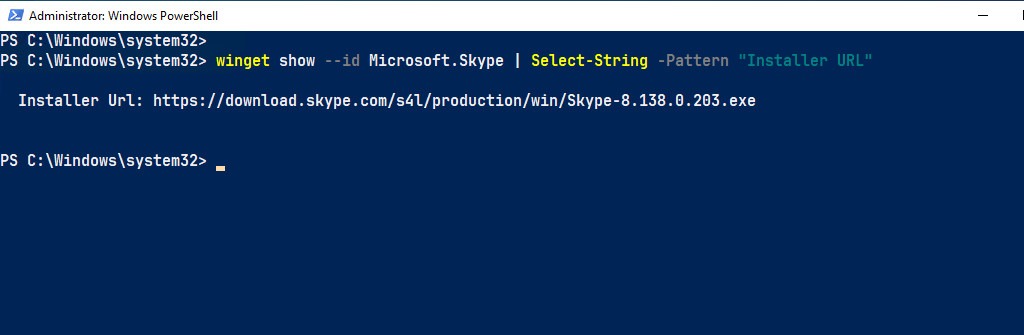
2. Please copy and execute the following command to get the official download link:
winget show --id Microsoft.Skype | Select-String -Pattern "Installer URL"3. You should see the output below with the direct download link for Skype. Please copy or take note of it, as we will be using it in automation scripts in the upcoming sections.
https://download.skype.com/s4l/production/win/Skype-8.138.0.203.exeMethod 1: PowerShell Script (*.ps1)
The first method described below is a basic PowerShell script designed to automate the silent installation of Skype. The script explanation:
- Declare the variables for Skype download link and the download file path in temporary folder.
- Downloads the Skype installer to the temporary location,
- Installs it silently using Start-Process with a silent install switch (no user prompts or UI).
- And then cleans up by deleting the temporary installer file.
# Declare variables
$DownloadLink = "https://download.skype.com/s4l/production/win/Skype-8.138.0.203.exe"
$InstallerPath = "$env:TEMP\setup.exe"

# Download and install the app
Write-Output "Downloading the installer..."
[System.Net.WebClient]::new().DownloadFile($DownloadLink, $InstallerPath)

# Install the app silently
Write-Output "Installing the app silently..."
Start-Process -FilePath "$env:TEMP\setup.exe" -ArgumentList "/VERYSILENT /NORESTART /DL=1" -Wait
Write-Output "The app has been successfully."

# Cleanup
Remove-Item -Path $InstallerPath -Force& "C:\scripts\install.ps1"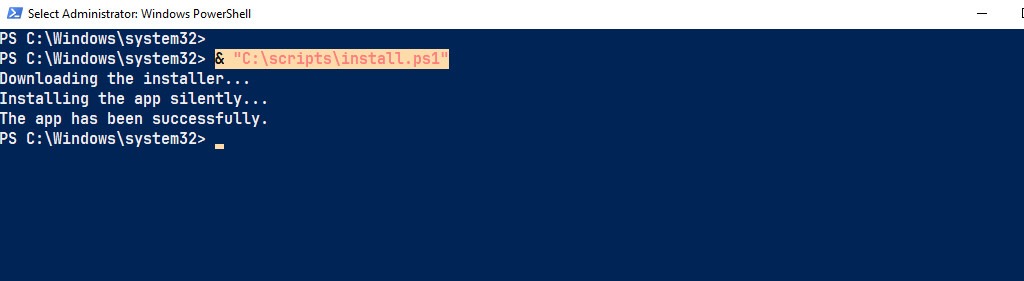
After a few moments, the Skype shortcut should appear. You will also find entries in the Start Menu, installation directory, and Programs and Features in the Control Panel.

Advanced PowerShell script
The below updated script is significantly more robust, user-friendly, and reliable compared to the basic one. Features like error handling, installation verification, and detailed logging make it better suited for professional environments or scenarios where reliability is a priority. You can get the script by clicking on the button below.
# Declare variables
$DownloadLink = "https://download.skype.com/s4l/production/win/Skype-8.138.0.203.exe"
$InstallerPath = "$env:TEMP\setup.exe"

# Download and install the app
Write-Output "Downloading the installer silently..."
[System.Net.WebClient]::new().DownloadFile($DownloadLink, $InstallerPath)

# Install the app silently
Write-Output "Installing the app silently..."
try {
    Start-Process -FilePath "$env:TEMP\setup.exe" -ArgumentList "/VERYSILENT /NORESTART /DL=1" -Wait
} catch {
    Write-Output "The installation failed. Error: $($_.Exception.Message)"
}

# Verify Installation
Write-Output "Verifying the installation..."
$RegKeys = @(
    'HKLM:\SOFTWARE\Microsoft\Windows\CurrentVersion\Uninstall\',
    'HKLM:\SOFTWARE\WOW6432Node\Microsoft\Windows\CurrentVersion\Uninstall\'
)
$AppInstalled = $RegKeys | Get-ChildItem -ErrorAction SilentlyContinue |
    Get-ItemProperty -ErrorAction SilentlyContinue |
    Where-Object { $_.DisplayName -like '*skype*' }

if ($AppInstalled) {
    Write-Output "The app is installed. Version: $($AppInstalled.DisplayVersion)"
} else {
    Write-Output "Failed to verify installation status."
}

# Cleanup
Write-Output "Cleaning up temporary files..."
Remove-Item -Path $InstallerPath -Force -ErrorAction Stop
Write-Output "Temporary files cleaned up successfully."
Write-Output "All tasks completed successfully."
# Output Advanced PowerShell script
PS C:\Windows\system32> & "C:\scripts\install.ps1"
Downloading the installer silently...
Installing the app silently...
Verifying the installation...
The app is installed. Version: 8.138
Cleaning up temporary files...
Temporary files cleaned up successfully.
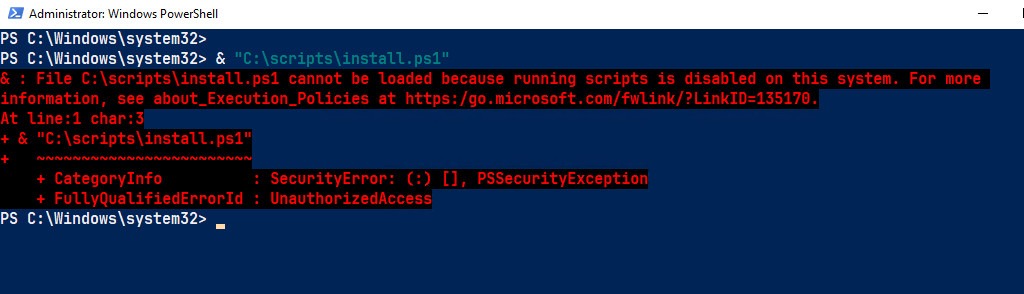
All tasks completed successfully.Troubleshooting Common Issues
- Command Not Recognized: Please ensure that the installer file path is correct and use the absolute paths instead of relative paths.
- Permissions Error: Execute PowerShell or Command Prompt with administrative privileges.
No Silent Switch: Please double-check that you are using the correct installation switch.
Debugging with Logs: Use the /log option to generate a detailed log file:
Method 2: Batch Scripts (*.bat, *.cmd)
The next method is using batch script. Batch scripting is great for quick, simple, and legacy tasks, but for powerful automation workflows, PowerShell is the modern solution. Unless you have a legacy requirement, familiarity with PowerShell will generally provide much greater flexibility and capability in the long run.
Explanation of the Batch Version:
- Declare the variables for Skype download link and the download file path in temporary folder.
- The script uses PowerShell inline (powershell -Command) to download the installer file,
- Silent install the application using the appropriate installation switches (no UI prompts are displayed).
- Deletes the installer file after installation to ensure no leftover files.
@echo off
setlocal
REM Define download link and target path
set "DownloadLink=https://download.skype.com/s4l/production/win/Skype-8.138.0.203.exe"
set "InstallerPath=%TEMP%\setup.exe"
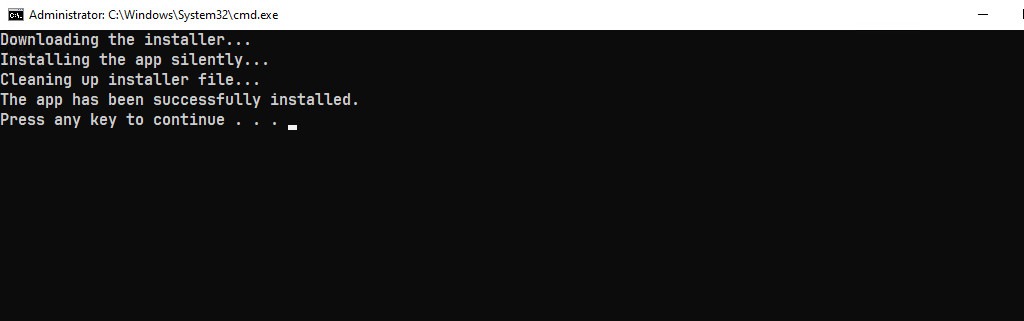
echo Downloading the installer...
powershell -Command "& {[System.Net.WebClient]::new().DownloadFile('%DownloadLink%', '%InstallerPath%')}"
echo Installing the app silently...
"%InstallerPath%" /VERYSILENT /NORESTART /DL=1
echo Cleaning up installer file...
del /q "%InstallerPath%"
echo The app has been successfully installed.
endlocal
pauseHow to run the batch script
2. Run the batch file with administrative privileges by right-clicking on the .bat file → Run as administrator.
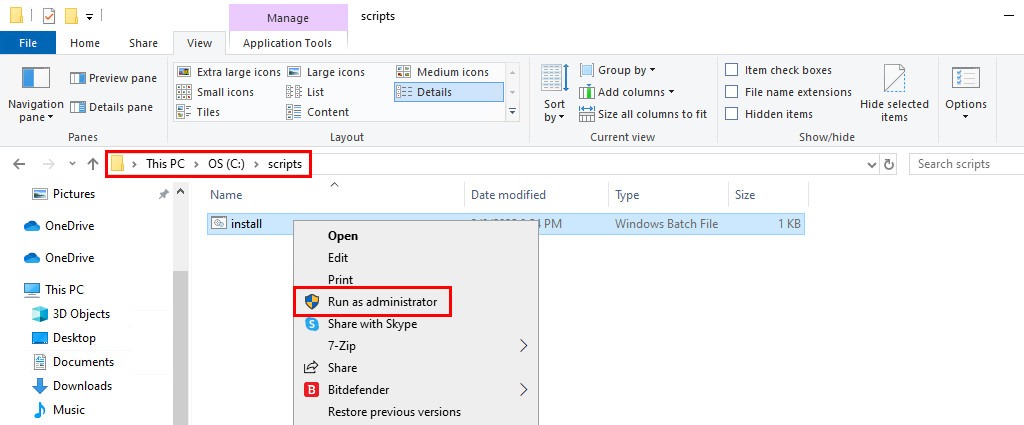
3. Verify the output to ensure that Skype has been installed successfully.
Method 3: Install Skype with package managers
Furthermore, on Windows computers, package managers can be used as an alternative to silently downloading and installing applications like Skype. Package managers make installations easier, faster, and repeatable, especially for IT administrators or developers managing multiple machines. Here’s an overview of using some of the most common Windows package managers to silently install Skype.
| 1 | 2 | 3 | 4 | 5 |
|---|---|---|---|---|
| Package Manager | Ease of use | Silent install | Official support | Popular apps |
| Winget [Recommended] | Easy | Yes | Microsoft | 2000+ |
| Chocolatey | Moderate | Yes | Community-driven | 9000+ |
| Scoop | Moderate | Yes | Community-driven | 1500+ |
Install Skype with Windows Package Manager (winget)
Winget (Windows Package Manager) is Microsoft’s official command-line package manager that ships with Windows 10 and Windows 11. It’s simple, lightweight, and perfect for managing software installations.
PS C:\Windows\system32> winget
Windows Package Manager v1.10.340
Copyright (c) Microsoft Corporation. All rights reserved.
The winget command line utility enables installing applications and other packages from the command line.

usage: winget  [<command>] [<options>]

The following commands are available:
  install    Installs the given package
  show       Shows information about a package
  source     Manage sources of packages
  search     Find and show basic info of packages
  list       Display installed packages
  upgrade    Shows and performs available upgrades
  uninstall  Uninstalls the given package
  hash       Helper to hash installer files
  validate   Validates a manifest file
  settings   Open settings or set administrator settings
  features   Shows the status of experimental features
  export     Exports a list of the installed packages
  import     Installs all the packages in a file
  pin        Manage package pins
  configure  Configures the system into a desired state
  download   Downloads the installer from a given package
  repair     Repairs the selected package

For more details on a specific command, pass it the help argument. [-?]
To install Skype, open Windows PowerShell (Terminal) or Command Prompt (cmd) as an administrator, and then execute the following command:
winget install --id Microsoft.Skype --accept-package-agreements --accept-source-agreements# Output
Found Skype [Microsoft.Skype] Version 8.138
This application is licensed to you by its owner.
Microsoft is not responsible for, nor does it grant any licenses to, third-party packages.
Downloading https://download.skype.com/s4l/production/win/Skype-8.138.0.203.exe
██████████████████████████████ 87.4 MB / 87.4 MB
Successfully verified installer hash
Starting package install...
Successfully installedInstall Skype with Chocholatey
Chocolatey is one of the most popular Windows package managers. It simplifies software installation by automating the process. The code snippets below will install the Chocolatey package manager on your system:
Set-ExecutionPolicy -ExecutionPolicy RemoteSigned -Scope CurrentUser -Force
irm https://community.chocolatey.org/install.ps1 | iex
choco feature enable -n allowGlobalConfirmation
Once Chocolatey is installed, execute the following code to install Skype silently:
choco install skype# Output is truncated
...
Chocolatey v2.4.3
Installing the following packages:
skype
By installing, you accept licenses for the packages.
Downloading package from source 'https://community.chocolatey.org/api/v2/'
Progress: Downloading skype 8.138.0.203... 100%
skype v8.138.0.203 [Approved]
skype package files install completed. Performing other installation steps.
Downloading skype
from 'https://download.skype.com/s4l/download/win/Skype-8.138.0.203.msi'
Progress: 100% - Completed download of C:\Users\chris\AppData\Local\Temp\chocolatey\skype\8.138.0.203\Skype-8.138.0.203.msi (88.09 MB).
Download of Skype-8.138.0.203.msi (88.09 MB) completed.
Hashes match.
Installing skype...
skype has been installed.
skype can be automatically uninstalled.
The install of skype was successful.
Deployed to 'C:\Program Files (x86)\Microsoft\Skype for Desktop\'Install Skype with Scoop
Scoop is a free and open-source command line installer for Windows-based systems. If you are a command line lover or a Linux user who recently switched to Windows, then this is the tool you would like to use to manage your programs and plugins in your computer.
Execute the following commands to install the Scoop package manager and add the required Scoop bucket.
Set-ExecutionPolicy -ExecutionPolicy RemoteSigned -Scope CurrentUser -Force
iex "& {$(irm get.scoop.sh)} -RunAsAdmin"
scoop install git
scoop bucket add extras
# Output is truncated
...
PS C:\Windows\system32> iex "& {$(irm get.scoop.sh)} -RunAsAdmin"
Initializing...
Downloading...
Extracting...
Creating shim...
Adding ~\scoop\shims to your path.
Scoop was installed successfully!After installing Scoop, execute the following command to install Skype silently and automatically.
scoop install extras/skype# Output is truncated
...
Scoop was updated successfully!
Installing 'skype' (8.138.0.203) [64bit] from 'extras' bucket
Skype-8.138.0.203.exe (87.5 MB) [============================================] 100%
Checking hash of Skype-8.138.0.203.exe ... ok.
Extracting Skype-8.138.0.203.exe ... done.
Linking ~\scoop\apps\skype\current => ~\scoop\apps\skype\8.138.0.203
Creating shortcut for Skype (Skype.exe)
'skype' (8.138.0.203) was installed successfully!Uninstall Skype Silently
If the application is no longer required, it can also be uninstalled silently. Below are several methods to remove it depending on how it was installed.
Using CMD (Batch script) to uninstall silently
Below is a one-line command to uninstall Skype silently and automatically. The command can be executed in Command Prompt (CMD) or by creating a batch script and then executing it.
"%ProgramFiles(x86)%\Microsoft\Skype for Desktop\unins000.exe" /SILENTUsing PowerShell to uninstall silently
Alternatively, the following code provides an advanced script to uninstall Skype with error handling.
# Unstall Silently
Write-Output "Uninstalling the app silently..."
try {
    Start-Process -FilePath "${env:ProgramFiles(x86)}\Microsoft\Skype for Desktop\unins000.exe" -ArgumentList "/SILENT" -Wait -ErrorAction Stop
    Write-Output "The app uninstallation successfully"
} catch {
    Write-Output "The installation failed. Error: $($_.Exception.Message)"
}
Using package manager to uninstall silently
If Skype was installed via a package manager, run this command in an elevated Command Prompt or PowerShell to uninstall it silently:
# Windows Package Manager (winget)
winget uninstall --id Microsoft.Skype

# Chocolatey
choco uninstall -y skype

# Scoop
scoop uninstall extras/skype
Method 4: Group Policy (GPO)
Deploying Skype across your domain-joined Windows machines can be quick and hassle-free with the help of Group Policy. Advantages of GPO Deployment:
- Centralized management: No need to manually touch individual machines.
- Silent and automated installation: Perfect for enterprise scenarios.
- Easy to configure additional settings using Group Policy.
Group policy software deployment does not support exe files by default. So, you will need to use a script and group policy to deploy software with an exe. I’ll show you these steps below.
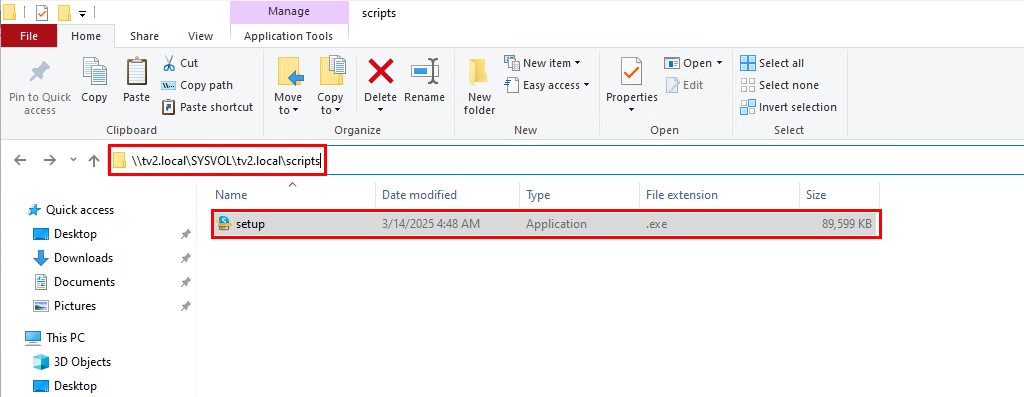
1. First, download the Skype installer file (*.exe) and rename it to setup.exe, and then copy it to a network-accessible shared folder that all domain computers and domain users can access.
2. Next, create a PowerShell script as follows (Ensure to replace the $filepath with your specific path).
# Script to install via Group Policy
# Steps in this script:
# 1. Check the file exists to determine if the program is already installed.
# 2. If the file doesn’t exist then it will start the install process.
# 3. If it does exist it will move to the else line and do nothing.

$installPath = 'C:\Program Files (x86)\Microsoft\Skype for Desktop\Skype.exe'
if (-not (Test-Path -Path $installPath)) {
    $filePath = '\\tv2.local\SYSVOL\tv2.local\scripts\setup.exe'
    Start-Process -FilePath $filePath -ArgumentList '/VERYSILENT /NORESTART /DL=1'
} else {}
It is a very basic PowerShell script. You can modify it and add logging or other options. The advantage of PowerShell is that you can customize it to your needs. We have saved it as install.ps1 for future use.
3. Now, on a domain controller, open the Group Policy Management Console (GPMC) then:
- Navigate to the Organizational Unit (OU) that contains the computers where you want to deploy Skype.
- Right-click the OU, and select Create a GPO in this domain, and link it here.
- Name your GPO something relevant, such as “TV2 – GPO Application Deployment”.
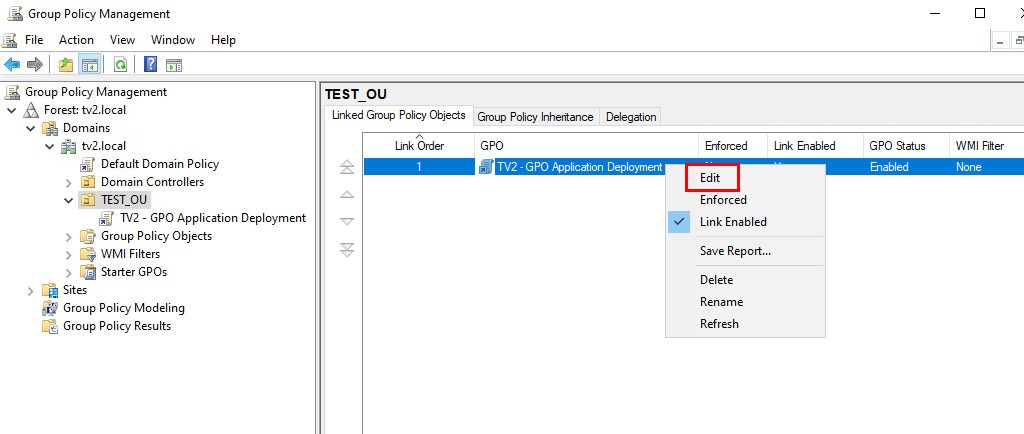
4. Next, edit the GPO by right clicking your newly created GPO and selecting Edit.
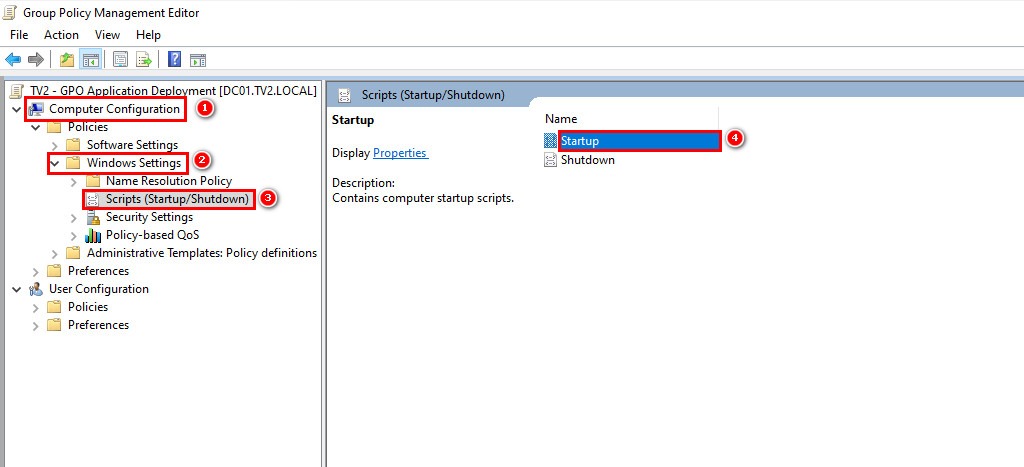
5. In the Group Policy Management Editor:
- Navigate to Computer Configuration → Policies → Windows Settings → Scripts (Startup/Shutdown).
- Double click on the Startup option to edit.
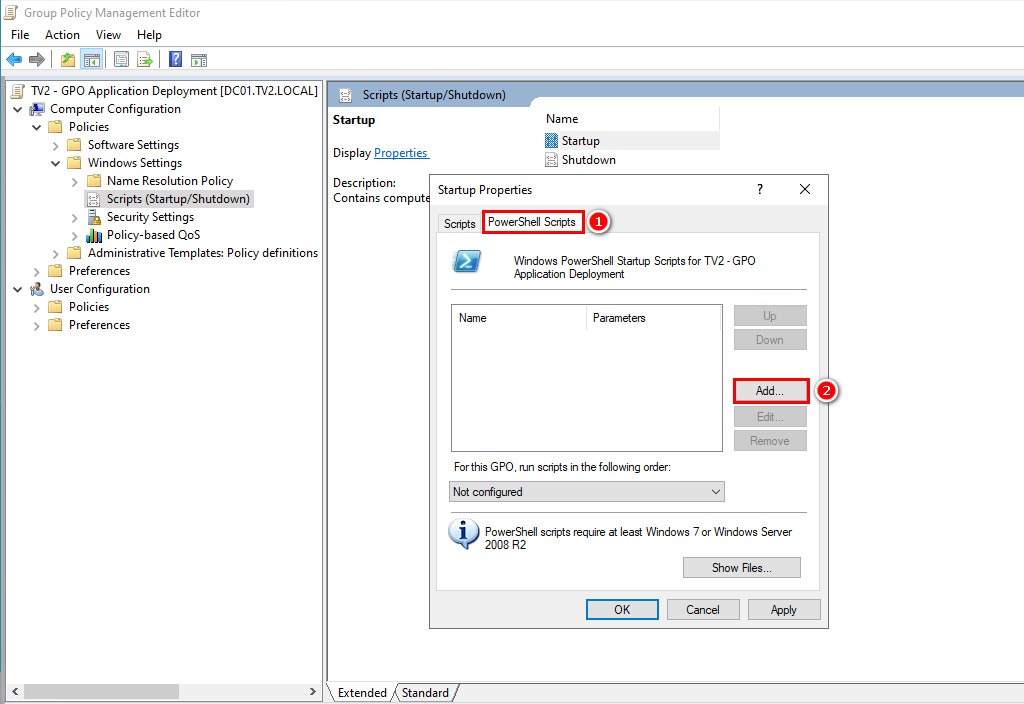
6. A new window opened. In this window, select the PowerShell Scripts tab → then click on the button.
7. Click on the Browse... button.
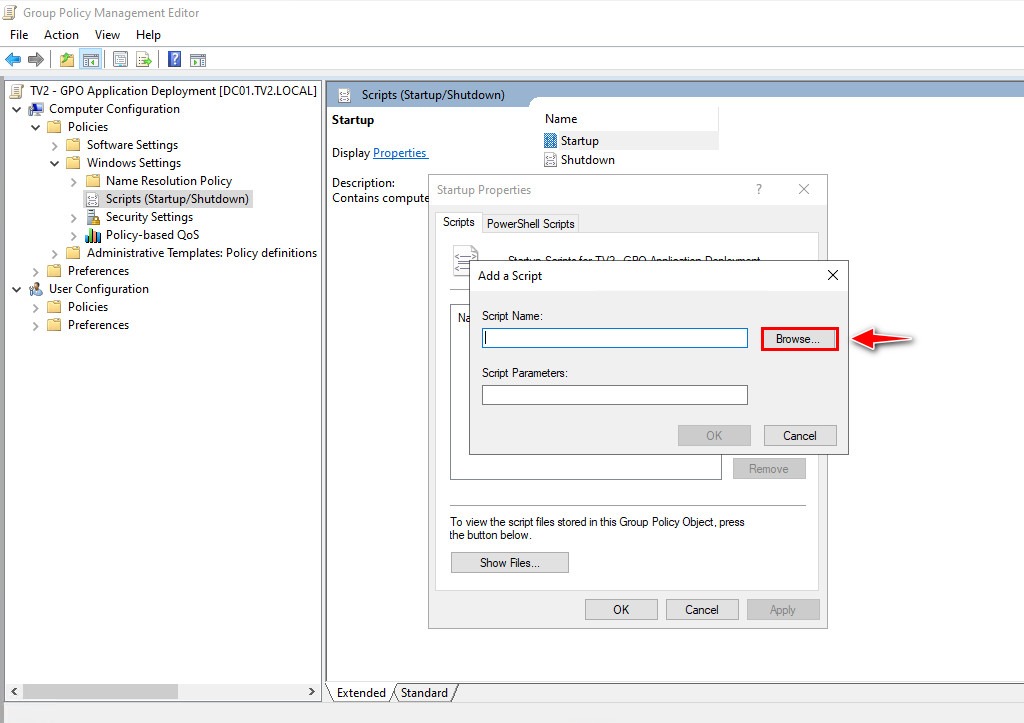
8. With the browser window opened, you need to copy and paste the install.ps1 file that you’ve created in the previous step into this window.
The GPO configuration is now complete. Reboot the computer in the targeted OU, and the software should be installed automatically.
7. To apply the GPO immediately, on a client machine, open Command Prompt or PowerShell as an administrator and then run gpupdate /force command.
# Output
PS C:\Windows\system32> gpupdate /force
Updating policy...

Computer Policy update has completed successfully.

The following warnings were encountered during computer policy processing:

Group Policy Client Side Extension Software Installation was unable to apply one or more settings because the
changes must be processed before system startup or user logon. The system will wait for Group Policy processing
to finish completely before the next startup or logon for this user, and this may result in slow startup and
boot performance.

User Policy update has completed successfully.

For more detailed information, review the event log or run GPRESULT /H GPReport.html from the command line to
access information about Group Policy results.

Certain Computer policies are enabled that can only run during startup.
OK to restart? (Y/N)
8. After applying the GPO, restart the computer. Then, check the Programs and Features or the Start Menu to confirm that Skype is installed. Alternatively, you can run the following command to check the status of GPO applied to the computer.
gpresult /r /scope:computer# Output
PS C:\Windows\system32> gpresult /r /scope:computer
...
RSOP data for on PC-001 : Logging Mode
----------------------------------------
OS Configuration: Member Workstation
OS Version: 10.0.19045
Site Name: Default-First-Site-Name
COMPUTER SETTINGS
------------------
CN=PC-001,OU=TEST_OU,DC=tv2,DC=local
Last time Group Policy was applied: 3/8/2025 at 7:24:54 PM
Group Policy was applied from: DC01.tv2.local
Group Policy slow link threshold: 500 kbps
Domain Name: TV2
Domain Type: Windows 2008 or later
Applied Group Policy Objects
-----------------------------
TV2 - GPO Application Deployment
Default Domain Policy
The following GPOs were not applied because they were filtered out
-------------------------------------------------------------------
Local Group Policy
Filtering: Not Applied (Empty)
...Key Notes and Troubleshooting
Conclusion
Silently installing Skype on Windows offers a streamlined, efficient approach for deploying the app across multiple systems, particularly in organizational or enterprise environments. By leveraging command-line parameters, users can automate installations without disruptive interfaces, ensuring consistency and saving time. This method is especially valuable for IT administrators and system managers tasked with large-scale deployments, as it minimizes user interaction and reduces potential errors.
Not a reader? Watch this related video tutorial: